Register now so you can:
- Secure your username/callsign!
- Subscribe to the newsletter!
- Keep track of your game stats!
- Post comments
- Download and upload levels!
 |
 |
 |
 |
|
 |
|
 |
|
 |
|
 |
|
 |
|
 |
Clones Level Editor GuideTable of Contents
OverviewClones (the game) contains a fully featured built-in level editor that enables one to create custom multiplayer and singleplayer levels as well as new CloneMaster maps. This guide will:
ScreenshotsHere are some screenshots of the level editor in action!!  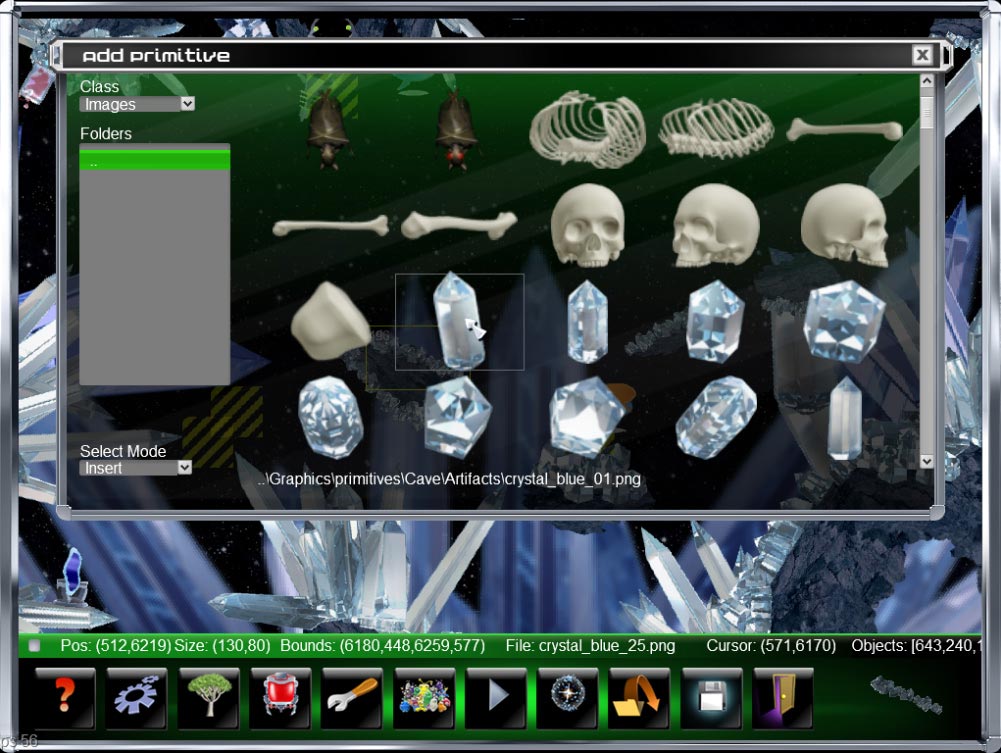 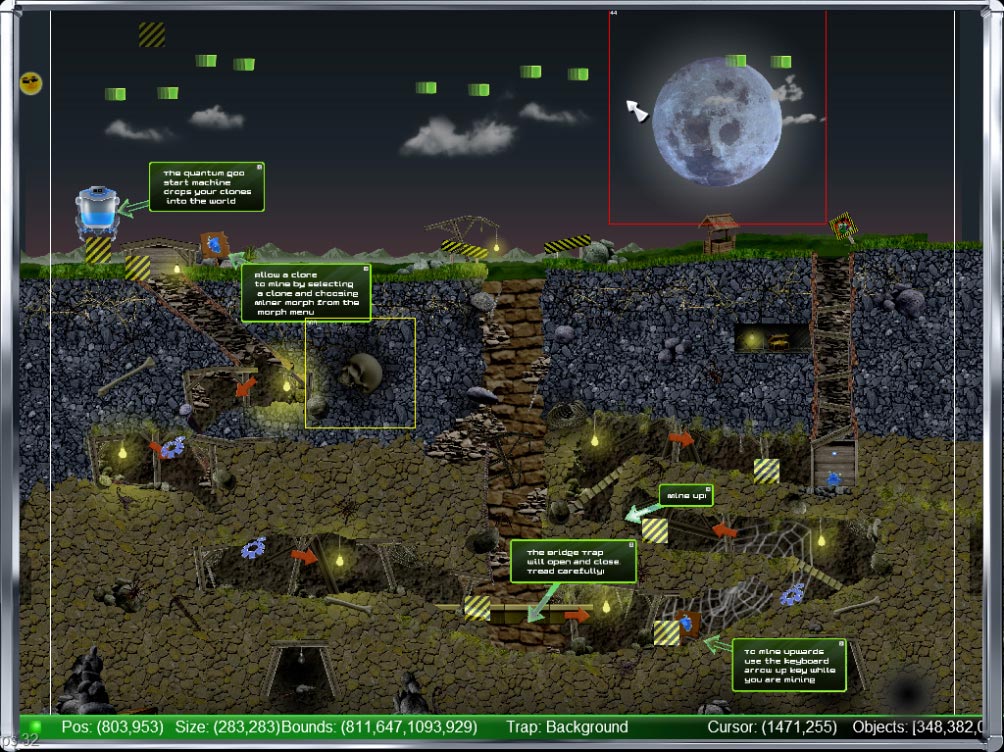 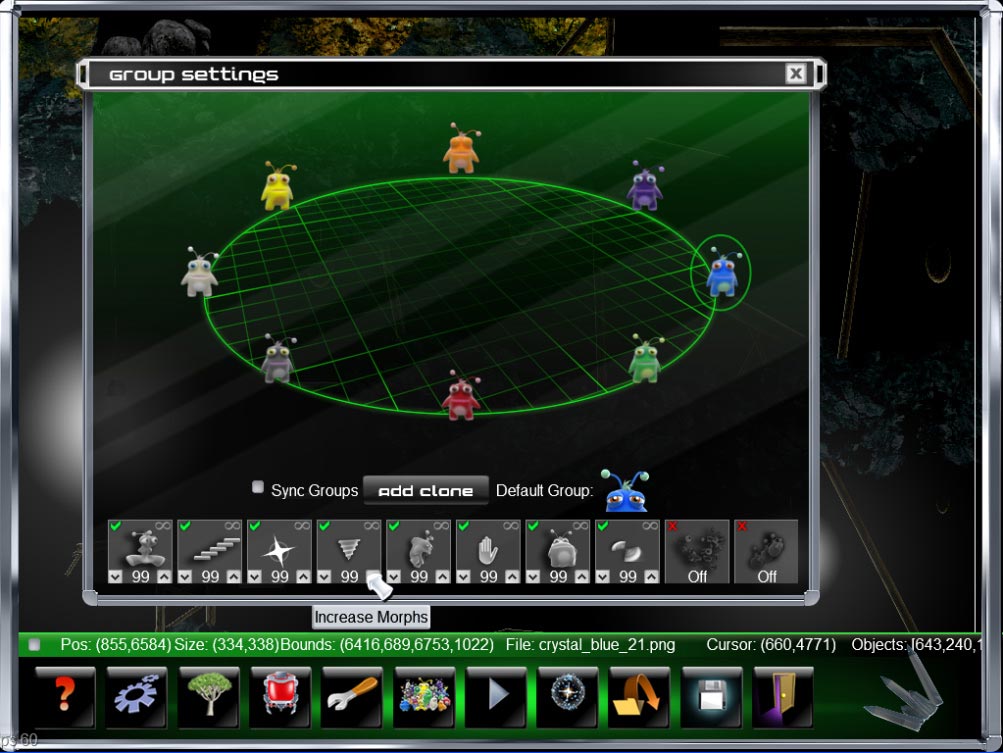 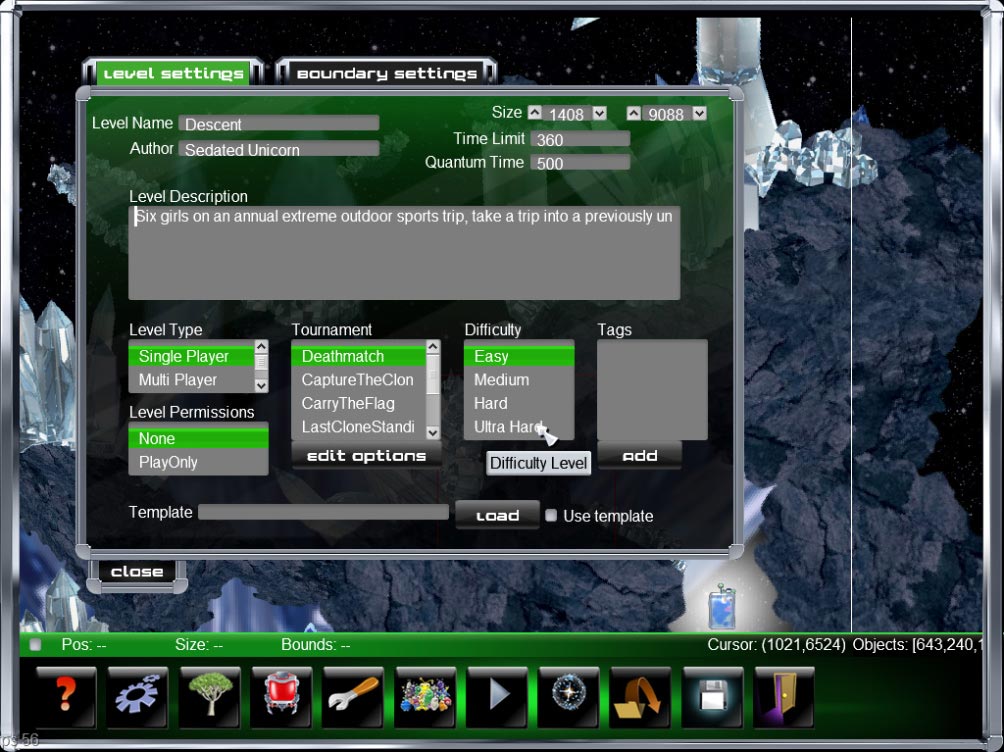 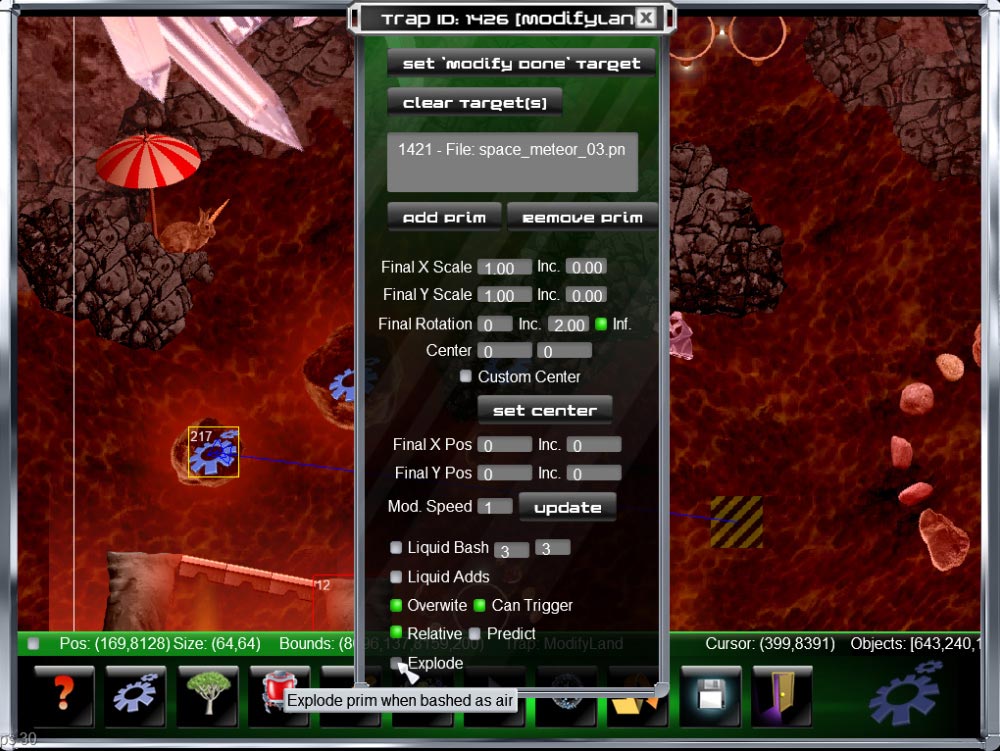  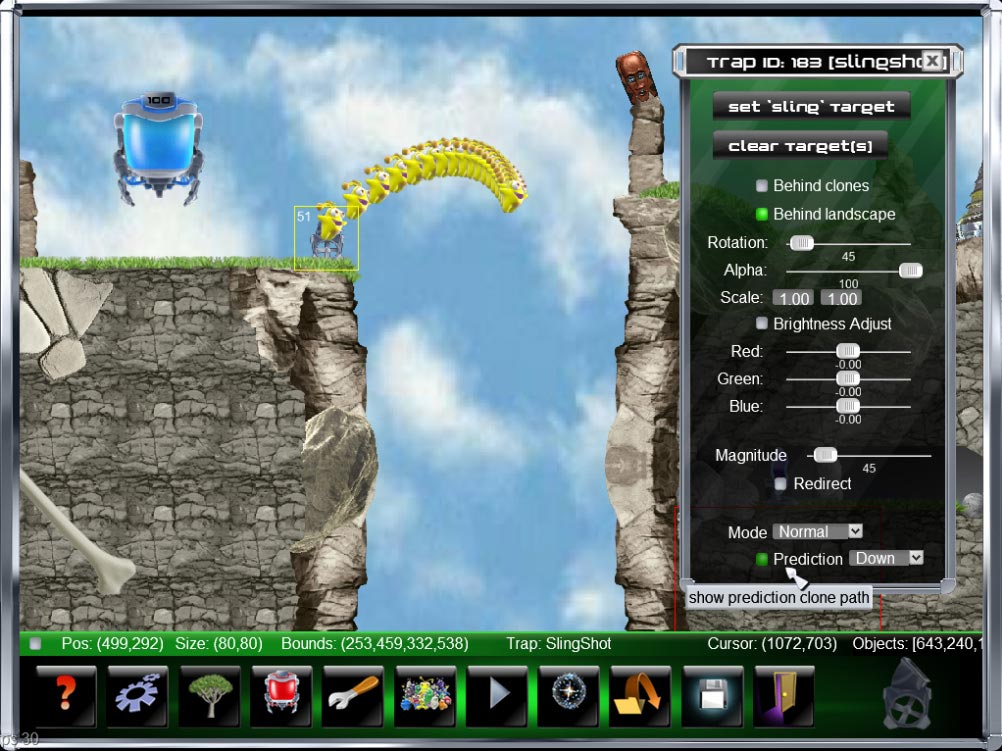 Clones Level Editor Architecture and FeaturesThe Clones Level editor is a tool that gives you the freedom to create completely new levels or modify existing levels. It is a WYSIWYG (What You See Is What You Get) editor which means that the level you are creating will look exactly like it does when you are playing the level. A typical level is built from individual objects known as primitives (which are simply images such as rocks, or beams, for example), traps (which are interactive elements of the level), and Clones (which are pre-positioned in the level). All level objects appear graphically in the editor, but are not necessarily visible when the level is played (based on the type of object and its configuration). By arranging many of these level objects and modifying their properties you can create dozens of totally awesome and unique levels! Notable Features of the Clones Level Editor
With the Clones Level editor it is possible to quickly create balanced (i.e. symmetric) multiplayer levels. The game is designed to efficiently handle large sparse level designs of up to 16384 x 16384 pixels in size as well as very long or very tall levels. Terrain primitives are the basic building blocks for creating the landscape of the level. They are nothing but simple PNG graphic files. A large selection of these are supplied with the game. The powerful layering and image transformation capabilities permit a large number of different looking levels to be created from a very limited number of primitives. For example, it is possible to use simple shapes to carve contours out of existing primitive groups, or use the blending operations to ‘paint’ onto the existing landscape. Clones Level Editor supports several extra objects called traps. These objects may provide non-interactive eye-candy for the game, visible interactive game elements, game rules and triggers, or level modifiers to name a few. Nearly all the game-play modification and configuration is done by adding and modifying these trap objects. The right combination of traps can drastically change the dynamics of the game! The pre-positioned Clones allow the level designer to add Clones of a certain group at a specific position on the level. This is required for the Capture the Clone tournament mode, but can also be used in other tournaments. For example, placing clones in a quarantined area that need to be saved, or as a way to handicap one group of clones! [back to top]Creating a Simple Clones LevelThis section will take you through the process of creating a very simple level.
Description of the Level Editor InterfaceHere is a break down of the various buttons and items you will find on the level editor interface. There are two basic regions: The main editing area where you can view and edit the level, and the panel on the bottom edge of the screen. The buttons on the bottom panel are:
On the bottom right of the panel, you will see a thumbnail of the object that is currently selected. Please refer to this to remind you which object is selected. Just above the bottom panel, you will see an information bar that displays information about the currently selected object or group of objects. This includes information such as object size, position, cursor position, object source filename, number of objects selected. [back to top]Editing Area and Description of Shortcut KeysThe level editing area shows a WYSIWYG representation of the level. It is very close to what the level will actually look like when played, but not exactly. This is because when the level is actually loaded the game rasterizes and flattens all the images to make an optimal representation of the level. This should be kept in mind when creating levels and be sure to always test your levels. [back to top]Scrolling/Viewing LevelThe bounds of the level are defined by a white rectangle. You can change the size of the level in the level properties pane. When nothing is selected (press CTRL+D or ESCAPE to deselect all) , you can use the PAGE UP, and PAGE DOWN keys to zoom in and out of the level. To get an entire view of the level hold onto the SPACEBAR key. While holding the SPACEBAR key you can use the mouse to select an object and after releasing the SPACEBAR key the view will zoom into the new selection. This is very useful for quickly going from one area of the level to another. The editor supports the ability to provide axis lines and grid lines to assist in creating symmetrical and aligned levels. The grid size can be adjusted in size, and the snap-to-grid option will cause the object that you move with the mouse to snap to the nearest grid edge. The axis lines are lines that are drawn on the vertical center, the horizontal center, and across both diagonals. These lines are often useful as reference lines. [back to top]Methods for Selecting Objects in the Level EditorAll the objects in the level can be selected and edited. There are multiple ways and multiple modes for modifying the current selection.
The primary object in a selection is identified by a yellow highlight. All other objects in a selection are highlighted with a white rectangular outline. In addition, the bounds of the selection are identified by a yellow rectangle. The primary object in a selection is important when editing the selection (see editing section for additional information). You can also select ALL objects using the CTRL+A shortcut key. Likewise to remove all objects from the selection, press CTRL+D or ESCAPE key. You can also select the ‘next’ and ‘previous’ object using the ] and [ keys respectively. The next object will be the next object of the same base type (ie. terrain primitive, trap, or clone). When there are multiple objects in the selection, then the next/previous object will change which object is the primary object in the selection. Whenever you move the mouse over any object a red rectangle will appear around it indicating that it is the one that will be selected if you single right click on it (or single left click on it – assuming that the object is outside the bounds of the existing selection). Sometimes multiple objects will be overlapping in the same area, so in order to select a specific object, you can press the TAB key. The tab key will cycle through all the object currently underneath the cursor and select each one, one at a time. Remember to keep the cursor over the location of the object you want to select as you continue to press the TAB key. There is an editor option that allow you to include or exclude traps when using the selection box to multiselect objects. It is useful to exclude traps from the selection when creating symmetrical levels and you only need to select and edit the terrain primitives. [back to top]Editing an ObjectThere are numerous ways to edit an object. Some editing can be done graphically by manipulating the object with the mouse, and other editing can only be done via the properties window. Before any editing can be done on an object, it must be first selected (see section on how to select an object). The editor supports undo and redo functionality that allows you to revert your changes and restore the level to a previous state. Pressing CTRL+Z is for undo and CTRL+Y is for redo. A complete undo history is stored, thus you can undo all the way back to how the level was when it was opened. You can delete selected objects by pressing the DELETE key. If you accidentally delete an object, you can undo this operation. All of the objects in the level support a properties window that can be displayed by first selecting on the object, then right clicking within the selection bounds. The properties window will display near the object. You can then change the properties in the window. When editing some of the properties you will see immediate changes to the object, while other properties are only applied to the object when the properties window is closed. To close the properties window, you can right or left click anywhere outside of the properties window or press the ESCAPE key (or click on the close button in the upper right corner). When multiple object are selected, the properties window will only be shown for the primary object that is selected (see object selection for a description of the primary object) and only the primary object is edited. To apply the properties to all common types of objects in the selection, hold down the SHIFT key while closing the properties window. In this case, only the modified properties will be applied to all objects of the same type as the primary object. Moving an object or a selection can be done by any one of many methods. The simplest way is by left clicking within the bounds of the selection and dragging it to its new location. Holding the SHIFT key while dragging the selection will cause the move operation to be orthogonal (ie. Move perfectly horizontally or perfectly vertically). You can also move the selection with the keyboard using the arrow keys (up, down, left, and right arrows). Normally, the arrow keys will only move the selection by 1 unit at a time. Hold down CTRL key at the same time to move the selection by 10 units at a time, and SHIFT to move the selection by100 units at a time. To center the selection horizontally, press the X key on the keyboard, and to vertically center, press the Y key. Pressing both X and Y in sequence, will center the selection in the middle of the level. You can also move objects by stacking them next to each other. To do this, you must first select a single object (this operation doesn’t work with multiple objects selected). Then hold the S key and single left click on the target object that you want to stack to the right of the reference object. If the sizes of the two objects are not the same, then the objects will be vertically aligned with each other. To stack to the left of the reference object, simply hold SHIFT+S before left clicking on the target object. Likewise, you may stack vertically using the D, and SHIFT+D for stack down and stack up respectively. The editor supports snap to grid functionality and this is very useful when you want to align objects along orthogonal lines. Under editor options, check the “Enable Grid” and “Snap to Grid” options. When enabled, the current selection preferentially align it’s edge with the nearest grid line only when the selection is moved with the mouse. Movement of the selection using the keyboard ignores any of the grid snap rules. In some cases, you want to get the currently selected primitive object to “fall” down to the landscape below it. This is useful when you want to quickly place an object on top of existing terrain based on the collision point. First select the object that you want to “drop” then press L. Holding SHIFT and/or control while pressing L will drop the primitive in different directions. This only works for the primitive base type. [back to top]Mirroring/Flipping/FloppingThis section will deal with mirroring and flipping that does not make a copy of the original section first. Please refer to the “Copying” section if you want to copy before the mirror/flip operation. Also note, that not all objects support these operations. The mirror/flip/flop operations are most applicable to the terrain primitive types of objects. To flip the selection horizontally in place, press the H key. Likewise a vertical ‘flop’ is performed by pressing the V key. To mirror about the vertical axis, hold the SHIFT key prior to pressing H or V for horizontal mirror, or vertical mirror respectively. If you have two objects that are on the screen and you want them exactly equidistant from the vertical or horizontal center then you can do this by selecting the first object (that will act as a reference), then hold down the M key while you left click on the second object. The second object will be moved exactly opposite the vertical center from the reference object. Likewise, holding the N key while clicking on the secondary object will position it in the mirrored vertical direction. No copies of the reference or target are made. You may also mirror objects with respect to the diagonals lines going from the top-right to the bottom-left, and from the top-left going to the bottom-right by pressing K or J respectively. [back to top]CopyingThere are numerous ways of performing copies of objects, many of which are combined with the mirroring/flipping/flopping operations for convenience. The most basic copy operation begins with selecting an object or a group of objects. Then move the cursor in the direction you want the copy to be place relative to the selection, then press CTRL+C. When this is done, the new copy is “stacked” in the direction that was suggested by the cursor, and the new copy becomes the current selection, so that the process can be repeated again. In this way, it is very fast and easy to make levels from tiled objects (such as bricks, tiles or rectangular stones). If instead you press CTRL+SHIFT+C when copying, the the resulting copied selection will be mirrored in the direction it was copied (either mirrored vertically or horizontally). Pressing CTRL+V on a selection will copy and mirror it vertically about the vertical center. Pressing CTRL+H will copy and mirror the selection about the horizontal center. Pressing CTRL+J will copy and mirror the selection about the top-left to bottom-right diagonal, and CTRL+B will copy and mirror the selection about the top-right to bottom-left diagonal. [back to top]RotationYou may rotate a complete selection of objects or just an individual object. Rotation is performed about the center of the selection. This means that the objects will be translated in order for all the objects within the selection to keep their relative orientations. Rotation can be invoked by holding the F key while moving the mouse up and down. This will rotate the object 15 degrees at a time (locked). For finer rotation adjustment, hold SHIFT+F while moving the mouse up and down. You can also open up the properties window for the selected object and enter the rotation value directly (for those objects that support rotation). Some object may not support rotation, but rather an orientation. For example, when you rotate a cloning chamber (start point), it will graphically rotate, but will only change the gravity of the clones from the chamber when the rotation exceeds 45 degrees. To rotate the selection by 90 degrees clockwise, press the “PERIOD” key, and to rotate counter clockwise, press the “COMMA” key. [back to top]ScalingScaling with the mouse is only supported for terrain primitives. Scaling can be performed on a single primitive, or a selection of primitive (with some restrictions). With the current selection, press and hold the W key to enable scaling mode, then left click and drag within the selection bounds. Dragging up and down will change the scaling of all objects within the selection, keeping the relative positions of the objects consistent. Holding down CTRL+W during scaling will make the scaling resolution finer so as to achieve better control of the final scaled size. The scaling process keeps the aspect ratio at unity unless the SHIFT button is held down. Holding down SHIFT+W will enable scaling of the X and Y relative to the objects local axis (orientation). Because it is relative to the local object, this mode of scaling is only active when one object is selected (a multiselection deactivates this scaling mode). This is a fundamental limitation of the way primitives are transformed in the editor. Scaling values can also be directly entered into the property text values on the properties configuration window. A negative scaling value is valid and represents a horizontal flip or a vertical flop of the object. Keyboard driven scaling is performed using the MINUS key [-] to scale down by 0.5, and the EQUAL key [=] to scale up by 2. Some traps can be scaled if the keyboard is used. [back to top]Tinting and Alpha BlendingTinting can be performed on all terrain primitives and some traps (that support it). You can adjust the red, green, and blue channels separately to obtain varying effects on the image. For example, if there is water nearby, you may want to apply a blueish tint to the object to make it look like there is a glow coming off the water. The tint operation can only increase the color channel by a maximum of 127 or decrease it by a maximum of 127 from the current pixel value (channels are 8bit per color giving a dynamic range of 255). Dynamically modifying the tint can be performed by first selecting the object to modify, then holding the R, G, or B key for red, green, and blue respectively, then moving the mouse up or down to change the tint value. By modifying all three channels simultaneously, the brightness can be adjusted. Holding down the O key while moving the mouse will modify the brightness of the object. Alternatively, you can open the properties window of the selected object and use the slider bars to adjust the tint. Check off the “Adjust Brightness” option to lock all three channels. Right click on the slider bar to toggle between the following three states: minimum value, maximum value, and middle value. Right clicking is a fast way to reset the tint back to the default (no tint). Only terrain primitives support adjustable alpha values. The range of alpha values goes from 0 (meaning completely transparent) to 100 (completely opaque). The alpha value of an object can be modified by first selecting it and holding the A key while moving the mouse up and down. Alternatively, you can also open the properties editor (by right clicking on the object), then changing the alpha value with the slider bar. It is important to note the blending behaviour of terrain primitives as the alpha values are modified. If the object is flagged as “low quality”, then it will not be blended to the air unless it has 100 alpha, or if it there is existing land beneath it. Please refer to the terrain primitive blending operations document section for detailed explanation of all the blending rules. [back to top]MeasurementDuring level design, it is often important to determine if certain parts of the landscape are the correct dimensions and position according to the rules of the game-play. For this reason, you can press and hold the / (forward slash) key to display a regular sized clone at the current cursor position. This is a useful method for measuring the height of tunnels or overhangs, or getting a feeling for the relative dimensions of the level with respect to the clone’s size. Another measurement tool, known as the critical fall distance, is display at the cursor’s position when you press and hold the E key. The critical fall distance is the maximum height from which a clone can fall without atomizing when it hits the ground. Use this tool when creating cliffs to determine if they are safe to fall from. [back to top]Terrain Primitive Object Description and Blending OperationsThe terrain primitive object (let’s just call it the primitive) is one of the most important objects in the level editor. Primitives are small images that are imported into the level, and used to create the landscape that the clones interact with in the game. The primitives can be transformed by rotation, scaling, tinting, and blended with the existing landscape in various ways through alpha blending (additive), overlaying, and carving for example. By using all these transformation and blending tools available to you, it is possible to create many different and exciting looking levels using a small number of primitives. The supported file format for the source images for primitives are: PNG files, with alpha channel support, and JPG files. There are already hundreds of available images that can be used as primitives that are available in the core Clones installation. To add new primitive to the level, you can press the F3 key (or click on the ‘Add Terrain’ button in the menu bar at the bottom of the screen). This will display an image browser that will allow you to navigate through the folder structure (folder names categorizes the images into different themes, and functions). Clicking on a filename, will display a preview of the image. Click ‘OK’ to add the primitive. The primitive will be added to the center of the viewable area. Primitives support different land types that affect how blending operations occur, as well as how Clones interact to that portion of the landscape. All the possible types of land and their functions are described below:
The z-order of the primitives is very important to how the blending operations occur. When a primitive is selected in the editor, a number is displayed in the upper left hand corner where 0 is the farthest primitive, and increasing positive numbers indicate the primitives that are more “in front”. The blending operation starts at primitive 0 and subsequently blends each one. Whenever a new primitive is added, it gets placed to the top of the blending order. The z-order can be changed by pressing the HOME key to bring the primitive to the front-most position, and the END key to take the primitive to the back-most position. Decreasing the z-order is done by pressing PAGE DOWN and increasing the z-order is done by pressing PAGE UP. Soil, Clonium and Bridge land types add to the existing landscape, while Air removes from the existing landscape. Air is used as a “eraser” or a carving tool. Each primitive has the option to control which landscape to modify. This is in reference to the landscape that is there just before the blending operation occurs. The options are:
In the properties editor, you will also notice two additional options called: Bash On Load, and High Quality. Bash On Load is checked by default, but in some cases you want to exclude a primitive from being added to the landscape when the level is loaded, and unchecking this option will do this. This is mostly done when enabling dynamic landscape operations (through triggers and events) with the Modify Land Trap where the “hidden” primitive can materialize when a certain event occurs (see the description of this trap for more details). The “High Quality” option is most relevant when the primitive has a lot of alpha in the image and/or if the primitive has it’s global alpha set to a value other than 100. In these two cases, it is advantageous to set the “high quality” option so that the primitive gets rendered with all it’s alpha intact. The “High Quality” option incurs a slight performance hit, which is the reason why the low quality is the default. Without High Quality enabled, if the primitive has an alpha less than 100, then the primitive will not be blended against the Air (it disappears), but will blend against existing landscape. This is by design. [back to top]Shortcut Key Reference
Guidelines and Best PracticesThe level editor is a very powerful tool and there are certain guidelines that will help you to create levels that provide a more enjoyable gaming experience. It is strongly recommended that you consider these guidelines before making a lot of levels. Become an efficient level designerAs you will quickly find out, many of the editing functionality is performed using the keyboard and mouse (in combination, or separately). It is recommended that you learn all the keyboard shortcuts as it will definitely increase the speed at which you create levels. Note that some of the functionality can only be performed using the shortcut keys. The default key shortcuts have been all carefully thought out to make it easier to remember the keys. Please refer to this document, or the inline help in the editor (press F1) for a complete listing of all the shortcut keys. Making levels is fun and easy. One of the fastest ways to build up a level is to take advantage of all the different modes of copy and paste functionalities (with mirroring). If you want to add an object, and that object already exists somewhere in the level, it is fastest to copy it, then tweak its properties as desired. In order to make the multiplayer levels fair they should be symmetric. It is recommended that only half of the level be created (either right or left, top or bottom), and simply mirror-copy to the other half when completed. This saves a lot of time, and ensures that the level is completely symmetrical. Load Times - OptimizationWhen creating your own image files, it is best to try to keep them small and focus on reusing existing images to create your levels. Clones has an optimized landscape generation engine that is able to quickly load and render your levels within the game. However, if you want your levels to load faster, follow these recommendations:
Level DesignWhen designing a level, first take a few moments to consider the following questions that will affect how you want the level to play:
Level design is truly an art form and answering some of the questions above will help you get a head start on quality level creation. With some thought, and lots of creativity, you will be quickly on your way with making outstanding multiplayer and singleplayer levels! Publishing LevelsAfter you create a level, we encourage you to publish your level to the ClonesGame.com website so that others can play and enjoy your creation. Here are a few recommendations to follow if you plan to publish levels.
Tips and TricksTo create 8 way symmetry, use the following method:
Level SettingsPress F2 to view the level setting screen. Here you can set various global options for the level. When creating a new level, you should always configure the global options first. Give the level a descriptive name, and try to be unique as possible. The level name that you use will be used as part of the filename when you save the level. Entering your name as the author allows you to indicate to others that you have made this level. The level description is used to give additional information about the level, either its location, its purpose, or to set the tone of what is to be expected. In addition to the description, it is advised to configure the tags for the level. Tags are used to provide additional information for the level so that it can be later search and organized according to the tags supplied. The more relevant the tags, the better your level will be found on the ClonesGame.com level sharing platform. You can add as many tags as you wish, but only add the tags that are relevant. The level size can be increased in height, as well as in width from a minimum of 1024x768 to a maximum of 16384x 16384 in increments of 128 block sizes. The current architecture of the clones rendering engine allows for very sparse level designs (ie. No memory is allocated for portions of the level that contain no graphical detail. So don’t be afraid to make large levels! The level type can be of single player or multiplayer. Its important to decide what type of level you are going to be designing before you start. When configuring for single player mode, you have the option of setting a time limit for the level. The time limit is specified in seconds. This is useful if you want to force the player to solve the level in a certain amount of time. Level permissions allow you to control how wish your level to be used. If you want to restrict people from editing your level, then be sure to select ‘Play Only’ as the permission. If you don’t want to impose any restrictions, then leave it to ‘None’. Specifying the difficulty of the level will help other players identify levels that are appropriate for their skill level. Please configure the difficulty to the best of your ability. Sometimes you have to play the level (or let others play the level), before you can decide on the difficulty rating. The tournament style are also configurable from the level settings screen. See the Tournament Configuration section for detailed description of each option. [back to top]Editor OptionsThe editor options control how the editor behaves, and how the certain elements are rendered. Normally when objects are selected, a number appears in the upper left hand corner indicating the z-ordering of the objects. A larger number means that it is more “In Front”, and a value of 0 is the “Farthest Away”. If you do not wish to display the z-order, you can disable this by unchecking the box. Highlighting clonium objects allows you to quickly see what parts of the level are clonium. This is indicated by a series of MMMM rendered on top of all the elements of the level that are clonium. It is advised that this option be normally left off. For increased rendering performance in the editor, you may want to disable the background. When this is done, the background is rendered as black. Snapping to grid is also an option in the editor. You can control the grid size, and the control the display of the grid points. When grid snapping is enabled, the selected object will snap to the nearest grid when moved with the mouse. This is useful when aligning certain elements. Object hotspots indicate where the center of rotation is. This is a useful visual aid when manipulating lots of objects with the mouse. When designing symmetrical multiplayer levels, it is useful to display the axis. When enabled the following lines are drawn: vertical center, horizontal center, upper left to lower right division, and upper right to lower left divisions. Normally when you are selecting multiple objects using the right click – drag method, only the primitives will be selected. If you want to include traps and clones into the selection box, then enable the multi-select traps option.
Smart Stack option is normally recommended, and it is used to stack primtives together
based on their actual pixel boundaries instead of the bounding box boundaries.
This is mostly useful for primitives that are rotated, or are of odd shapes.
This affects the copy/paste operations as well as the stack operations (S and D).
It is important to save the level often. The editor can save a backup copy of your
level whenever you save. Simply check the Perform Backups option to enable this.
Hold SHIFT while clicking on Open (F9) to load an exsting backup. You may
want to load an existing backup if you made a serious editing error in the current
level (that was already saved). Tournament ConfigurationSetting the type of tournament is performed on the “Level Settings” screen. Once selected, you can edit the tournament options to tweak the default settings. The default settings will be loaded when the level is loaded, but in a multiplayer game, the server host has the option to override these settings.
Contraptions (also known as Traps)All the dynamic interactive elements of the level are designated as contraptions. They can be used in many different ways to make the levels interesting and fun. There are five basic types of traps: Hazards, Machines, Environment, Logic, and Map. This section will describe each trap in detail and explain each of their configuration options. Many of the traps contain common properties, and all of them are represented visually in the level editor. Some of the traps, however, are not visually displayed when the level is played, but instead perform some control mechanisms. The control mechanisms allow for a level of scriptability and dynamic response based on the triggers and event mechanism for each of the traps. Each trap supports one or more events that can be used to trigger the activation of other traps. These triggers and events can be chained and linked together to form very complex actions. Each trap has a position, and it can be moved by any of the object positioning commands, or by dragging the object in the editor. To edit the trap properties, select the trap then open the configuration window by right clicking on it. Many of the traps also have the option to modify it’s the rendering layer (how it is displayed in the game). If you want trap to appear behind the clones, then check the “Behind Clone” option. Likewise, if you want the trap to appear behind the landscape, the check the “Behind Landscape” option. It is possible to configure any combination of the two rendering options. However, there are certain traps that will always render to the background irregardless of the rendering options. Also, certain traps will permanently modify the landscape in its vicinity (eg. The cloning chamber will bash itself as clonium when the level starts (so as the clones cannot go through it). Many traps also have a rotation parameter to modify the angle at which the graphic is rendered. Certain traps will modify its behaviour when the rotation is set to certain angles. For example, the cloning chamber will start producing clones with a different gravity if the angle is larger than 45 degrees from 0. Any special rotational dependencies will be mentioned when describing the trap in detail. Brightness and tint can also be adjusted for most of the traps. This is to allow for tweaking the default graphic to accommodate the theme of the level. Checking off the brightness adjust option will lock the red,green, and blue tint values so that when one is changed, they all change. Some of the traps also support pick up mode options. This is an alternate mode allows you to place a bonus item on the level that performs the same functionality of the trap, but can be limited to a finite set of uses (configured in the pickups edit box). The pickup is displayed as a animated sphere with an icon inside it. The two modes for pickup is the “on the ground” mode and the “floating” mode. The floating mode is useful when placing the pickup in the air, whereas the “ground” mode will produce an icon that bounces on the ground. It is important to properly place the “ground” pickup, so that the bouncing effect looks realistic. This can be done by placing the lower bound of the pickup so that it lines up with the underlying landscape. It is recommended that “ground” pickups be placed on level surfaces. For the traps where the group can be specified, valid values are from 0 to 7. These correspond to the following group colors:
Clone sizes can be specified as 0.5 (for small), 1 (for regular) and 2 (for large). HazardsHazards are traps that clones typically want to avoid because they impede or destroy clones in some fashion. WaterThe water trap contains three rendering modes: water, lava, and acid. They are hazards that is typically placed at the bottom of the level and whenever a clone falls in, they perish. The trap can be extended horizontally by increasing the number of “sections” such that the total width will always be a multiple of the width of one section. The water trap can be configured to contain a high tide and low tide with preconfigured timings between these tidal events. The flow rate parameter adjusts the animation speed of the graphic to simulate relaxing atmosphere (slow water movement), or intense (fast water animation). To control tidal activity use the following parameters:
Drown Event – When a clone downs in the water, the target is activated. ShockThe shock hazard electrocutes any clones that walk nearby. It can be increased in size by modifying the “Section” parameter. In addition, the trap can be rotated by any angle. When a clone is electrocuted, the trap fires the “Shock Event”. MushBombThis trap sends off a ring of energy that modifies any clone within its activation radius. There are six basic modifiers for the bomb:
The size of the activation radius can be adjusted as well as its speed of “explosion”. If you wish to configure the explosion to happen on a regular basis, then set the “Period” parameter to a non-zero value. The units is in number of game updates. When the mush bomb explodes, it fires the explode event. When the trap is activated, then it will cause an explosion to occur. Black HoleThe black hole hazard will suck up any clones that come too close to its center. Other than the common basic configuration options, there are no other advanced parameters for this trap. When a clone gets sucked into the black hole, the “Melt” event is fired. MachinesMachines are contraptions that clones can interact with directly on the level. The are mostly mechanical in nature and they can be used for various different purposes. TeleportTeleport trap teleports the clones from its current location to another location on the level. To configure the destination point, click the “Set Destination” button and click on the point in the level where you want to clones to be teleported. There are three modes of teleportation: Absolute, Relative to Clone, and Relative to trap. The mode determines how the final destination point of the clone is computed. When in Absolute mode, the destination point is the point you clicked on (when setting the destination), and will stay at this point even if the teleport trap is moved, or copied. When set to “Relative to Trap”, the destination point is computed relative to the current position of the trap. When the trap moves, or is copied, then the teleport position also moves. When “Relative to Clone”, it behaves similar to “Relative to Trap” except the destination point will be dependent on the direction the clone is facing. This way you can configure the teleport to computer the destination point “in front”, or “behind” the clone. This last mode is useful for creating symmetric multiplayer levels. When a clone teleports, it will fire the “Teleport Event”. SwapThe swap trap is primarily used in multiplayer levels but can be used in single player levels as well when properly integrated. The swap trap will change the group of any clones that walk by. It has an activation range very near the center of the trap. When a clone is swapped, it will fire the Swap event. SizeThe size trap is a special chamber that changes the size of clones that walk through it. It can be used to convert clones from any combination of small (1/2 size), to medium (nominal size), to large (2x size). When a clone is resized, it fires the “Resize Event” AntiGravThe antigrav trap is designed to change the gravitational direction of clones that walk into it. It operates based on the originating orientation of the clone such that the trap can be configured to change the gravity of clones from right side up to up side down for example. To setup a rule, click the input orientation, then the output orientation, then click on the “Add Rule” button. You can add as many rules as you want. By default, any input orientation is accepted. If you want to reset the rules, click on the “Clear Rules” button. When the “Use Area” property is set, then the trap becomes a hidden antigravity area. This is useful for getting clones to spontaneously walk on walls for example. When a clone changes it gravity, the “Gravitize Event” is called. AcidRainThe acid rain trap ejects particles that fall onto the ground and interferes with the actions of clones by either etching away at the landscape or adding additional particles to the landscape. You can control the frequency of ejection, the size of the ejected particle, and the number of bounces that each acid particle is allowed to bounce before it expires. This trap does not contain any events. BridgeThe bridge is made up of multiple (configurable) sections that can open and close based on a timer or based on the number of clones that are currently on the bridge. Setting the “Max Clones” parameter to 0 indicates that the bridge can hold any number of clones. The “Time Closed” and “Time Open” parameters are specified in the number of updates and specifying 0 for these times will disable the timer. The bridge supports the “Opening Event” and the “Closing Event” for triggers. SlingShotThe sling shot shoots a gust of air and propels the clone up into the air. It can be rotated in any direction and the magnitude of the air gust can be configured so that the clones can be pushed further away. You can check the “Flip Graphic” parameter to change the orientation of the graphic. To help in configuring the magnitude and rotation of the trap so that the clone will land at a certain position, click on the “Set Destination” button then click on the point the level. The editor will automatically compute the parameters for you. When a clone is propelled, the “Sling Event” is fired. StartThe cloning chamber produces clones of a certain (configurable) group. The quantity of clones in the chamber can be set from a minimum of 0 to a maximum of 999. The release rate (specified in ms) controls the delay between clone spawns. The “Facing” parameter controls the direction that the clones face when they spawn. The default of 0 (auto) will cause the clones to face the direction of the first exit. The scaling parameter can be adjusted from (0.5, 1, or 2x). The “Protection” parameter indicates that when the game starts a layer of protection metal should be added below that start point. This is to prevent fatal sabotaging of the start trap. When the “Default On” parameter is set, it indicates that the trap should be enabled by default when the level start. Otherwise, the player hosting the game must specifically enable this start point. When a clone spawns, the “Spawn Event” is fired and when there are no more clones left in the chamber, the “Empty Event” is fired. ExitThe exit trap is the device that allows the group to score points. When a clone is below the exit trap, it will get beamed into the trap. Like the start trap, the exit trap also supports the configuration of the group, the scale, protection, and the default on parameters (see Start Trap for details). The “Min Clones” parameter specifies the minimum number of clones that need to be captured so that the game state will evaluate to “Pass”. This is normally used for singleplayer mode. The “Max Clones” parameter indicates the maximum number of clones that the exit can capture before it becomes disabled. The “Bogus” option sets the trap to become a false exit and instead any clones that walk under it will be crushed. The “Exclusive” parameter, when set, only allows clones of that group to be captured by the trap. When the clone is captured the “Beamed Event” is fired. When a clone is crushed with the Bogus option, then the “Crushed Event” is fired. BlasterThis machine allows the player to shoot chunks of ice or fire when a clone walks into it. You can rotate and fire the gun using the controls that appear below. When a chunk of ice touches a clone, the clone will freeze. Fire will burn the clone. When a clone walks into the trap, the “Clone In Event” is fired. When the fire or ice is shot, then the “Blast Event” is fired. Entanglement TrapThe entanglement trap captures two clones in its chambers then entangles them so that whatever morph commands are given to one, the same command is given to the other. Only one use of the morph is counted, even though two clones are affected. When a clone is captured by the by the entanglement chamber, then the “Grab Clone Event” is fired. When the clones are entangled, then the “Entangle Event” is fired. Environment ContraptionsThese contraptions modify the way the level looks, behaves, and responds. ActionsThis is a bonus pickup item that can be placed anywhere on the level. When a clone touches the item, then additional morphs are given to the player. You can specify the quantity of the morphs and the morph type. When a clone picks up the actions, then the “Grabbed Event” is fired. SpeedWhen a clone touches a speed trap, it will modify the speed of certain clones based on the rules for that trap. It can be configured to modify just the clone that touched it, the entire group of the clone, all other groups, and all clones. This speed modifier only affects the clones that are currently on screen. The “Speed Time” parameter controls the length of the speed acceleration (in game updates), and the “Speed Factor” controls the speed multiplication (supported values of 2x, 4x, and 8x). When a clone touches the speed trap, the “Grabbed Event” is fired. FrozenThe frozen trap contains a clone inside of it and it can be thawed and freed when a clone walks by. The group any be set to any of the valid group ids as well as 255 to indicate the “free for all group”. In this case, the frozen clone will match the group color of the clone that thawed it out. The trap also has the option to mark the frozen clone as a “Dark Clone”. When the trap starts thawing, then the “Thawing Event” is fired. SlugThis is a little slug creature that crawls along the ground, sticking to the walls as it moves. It can be made as dangerous (a hazard) if the “Kill Clones” parameter is checked. Otherwise, it doesn’t really interact with the clones and is for graphical purposes only. The creature can be configured to move clockwise or counterclockwise by the “Clockwise” parameter. When the hazardous slug kills a clone, then the “Melt Clone” event is fired. ParticleThe particle trap is primarily used for the “Capture the Particle” tournament style. Usually the group id is set to 255 to indicate any group can capture the particle, but the trap can also be configured so that only a specific group can pick it up. When the particle is picked up by a clone, the the “Grabbed Event” is fired. When the particle is dropped, then the “Dropped Event” is fired. CameraYou can use the camera to pan, zoom or rotate the view of the level. Typically these options are activated by a proximity trap. It can also be set to go to an initial camera position automatically when the level starts. This trap does not support any events. BackgroundThis trap is one of the most common traps as it is used to decorate the level with non-interactive images and animation. This trap typically does not change the gameplay (completely non-interactive). The image or animation can be set to any PNG file (with alpha channel) or JPG image. The graphic’s z distance can be changed to give the illusion of depth. A positive distance is father away from the viewer, whereas a negative distance is closer to the viewer. A distance of 0 is where the landscape and other traps are rendered. You can specify the tiling so that the image repeats in the x or y directions. If the source image is an animated sprite, then check off the “Animated” checkbox and specify the frame size of each frame of animation. If “Play on Load” is checked, then the animation will start playing when the level starts, otherwise it will only play when activated by some other trap. This trap does not support any events. SkyThis trap controls the very far background image of the level. It must be a JPG, and it should tile nicely it order to look good in the level. Use the “Set Image” button to specify the background tile. The background tile can be animated as well using the various parameters producing various effects: Velocity X/Y – The movement in the x and y direction Rotation – The speed of rotation Rotation Axis X/Y – The point of rotation This trap does not support any events. SoundIt is possible to play a sound when a certain event occurs in the level. When the sound trap is activated, it will either play a sound effect, or change the background music. Use “Set Sound” button to set the sound file. You can also preview the sound by clicking on the “Play Sound” and “Stop Sound” buttons. By default, it will play the sound as an effect. Use the “Set Background” property to indicate that it should change the background music. This trap does not support any events. ChatThis trap, when activated, will send the pre-configured chat message to all players. It is a very good way to broadcast certain warning or informational messages. This trap does not support any events. LogicLogic traps are designed to provide state information, control how and when certain events occur, as well as modify other traps or other features of the landscape. ProximityThis trap provides a dual role: one is to detect the proximity of clones when they walk into the proximity area (Proximity Mode), and the other is to control other traps via the comprehensive list of actions (Event Dispatch Mode). When operating in “Proximity Mode”, be sure that “Can Trigger” is enabled, and the “Width” and “Height” properties are set. When a clone is detected in the bounds of the proximity area, then the trap is activated (all events fire). When configured as an “Event Dispatch Mode”, the trap is set as the target of another trap’s internal event. As opposed to other traps than can only Activate other traps when some sort of internal event occurs, the proximity trap can perform the following to other traps: Enable, Disable, Activate, Deactivate, Show, and Hide. Therefore, if you want any trap to perform any of these additional actions, then you must pair it up with a proximity trap. When the proximity trap is Activated, it will fire its entire list of assigned actions. To add an action, first selection the action you want to add, then click on the “Add Action” button. Then select the target trap that the action should be performed on. To remove an action, select the bound action, then click on remove. Advanced options allow the action to be delayed by a predefined number of game updates before events are fired as well as a delay between triggering of the trap. In addition, you can limit the number of times the proximity trap can be used, and the group that can use it. By default, the proximity trap is enabled, and by unchecking the “Enabled” checkbox, the proximity trap will start in the disabled state. This is useful when certain events must happen before the trap is enabled. When the clone walks into the tutorial trap, the “Read Event” is fired. WinLoseWhen a clone walks into the bounds of the WinLose trap, then a suggestion is made to the current game mode (tournament) that a loss or win has occurred. It is then up to the rules of the tournament to decide if an actual win or loss has occurred. To suggest a win state, ensure that the “Trigger Win” checkbox is enabled. PathThis trap is used to force the player to follow a certain order of events. The trap can be activated by a clone being within the bounds of the trap, but can also be activated by other traps. If a path node is activated without the others activated first, then a loss condition is suggested to the game. If the final node in the path is activated, and all others were activated in the correct order, then a win condition is suggested to the game logic. The ordinal number indicates the order at which the path must be activated. Be sure not to have two path nodes with the same ordinal. You can also make the path graphic not display by unchecking the “Visible on Level” parameter. When a clone enters the bounds of the path trap, it will fire the “Grabbed Target Event”. ModifyLandThis is a very power and flexible trap that can allow the simulated real-time transformation of landscape objects in the level. For example, it is possible to add or remove certain areas of the landscape or you can rotate and move landscape objects. The activation area can be controlled with the width and height parameters, and the trigger area is only used when the “Can Trigger” is set. The trap can be activated by a clone being within the bounds of the trap, or by an external activation event. First, you must add the primitive using the “Add Terrain” method (F3) in the editor. Modify its properties to your liking. In many cases, you do not want the primitive to appear with the level loads, so be sure to uncheck the “Bash on Load” in the primitive properties. Once you have your primitive ready, then you can open the ModifyLand trap properties and click on the “Add Terrain” button, then click on the primitive you want to dynamically bash. The advanced properties: “Liquid Bash” and “Liquid Add” are only relevant when you are bashing the primitive as air. When bashing as air you have the option of converting the primitive into particles and controlling if the particles are added to the landscape. The transformation parameters allow for x scaling, y scaling, rotation, and translation of the primitive from its current state in the level, to its final state. Leaving the increment values at 0 will disable that particular transformation. Larger increment values will cause the transformation to occur faster. By default, a modification will be performed every update, but it can be adjusted to perform every N updates with the “Mod. Speed” parameter. The “Overwrite” parameter, when checked, will not erase the existing primitive before bashing the transformed one. This is typically checked when scaling upwards, and unchecked when scaling downwards. The the modification is complete, the “Modify Done Event” is fired. GravitizeThis landscape modifier will pull any landscape pixels within its bounds downward. It is a special effect than can be used to simulate melting/wet land. Use with caution as it is computationally expensive and can cause the game to run very slowly! The install fall mode means that the particles will fall immediate (you will not see any animations). “Circle Mode” will cause the affected area to be a circle contained within the bounds, instead of the bounds itself! ModifyPosThis allows the movement of other traps whenever the modifypos trap is activated. The movement is by default specified by a delta amount (in x and y), but can also be specified as absolute coordinates (uncheck “Delta” parameter). ModifyFrameThe ModifyFrame trap is typically paired up with background traps that are animated (contain multiple frames). Click on the “Set Target” button then click on a background trap. There are different modes of operation for this trap: Goto frame will cause the target animation to goto the frame specified under the “Goto Frame” field. Next Frame/Previous Frame will simply advance the frame by 1, if at the end of the animation sequence, the frame will loop back to frame 0 (for next, and last frame from previous). The “Animate” option will cause the trap to set the animation to the start frame with the trap is triggered, then advance through the frames until the end frame is reached at which the animation then stops. The “FPS” parameter controls the frames per second rate. You may speed up or slow down the animations. AnnotationAnnotation is a way to display messages while references certain areas of the level. Type in the message you want the annotation to display. If the “Clickable” property is set, the annotation will close when you click on it. By default, the annotation is enabled, but you can disable it and enable it at runtime using a proximity trap. Click on the “Set Destination” button to specify where the arrow should be pointing to. When the annotation is displayed, the “Appear Event” is fired. When the annotation closes, the “Close Event” is fired. [back to top]Group SettingsYou can open the group settings screen by pressing F6 or clicking on the group settings button in the menu. Here you can configure all the morphs for each of the 8 groups. In most cases you want to synchronize the group morphs so be sure to keep the “Sync Groups” checked in. The first step is to select the group that you want to modify, then at the bottom of the window you will see a listing of all the morphs and their current settings. To enable/disable the morph, click on the upper left icon. When enabled, you can increase or decrease the number of morphs from a minimum of 0 to a maximum of 99. The checkbox at the upper right corner allows you to set the quantity to infinite, meaning that the player will never run out of those morphs. Note that in multiplayer, these morphs can be overrided by the host in the pre-game configuration screen. In this case, the configuration in the level editor will be the default values. In singleplayer mode, the morph settings cannot be changed. [back to top]CloneIt is possible to place preconfigured clones in the level. To add a preconfigured clone, open the group settings screen and click on the “Add Clone” button. This is useful for some singleplayer level designs as it allows you fine control over where all the clones start.
[back to top] Conclusion
Congratulations! You have now completed the entire clones level editor guide
and you should now have all the tools and knowledge to create fantastic and exciting
levels! If you have any ideas, level editing tips, comments, then please log
onto post them in the forums at http://forums.ClonesGame.com. There is a section
specifically for level editing. Godspeed Clone Master!!! |
Why Register?Register now so you can:
User loginRecent blog posts
Recent Forum PostsRegistered Members76564 Registered Members! Join today! Poster
|
||||||||||||||||||||||||||||||||||||||||||||||||||||||||||||||||||||||||||||||||||||||||||||||||||||||||||||||||||||||||||||||||||||||||||||||||||||||||||||||||||||||||||||||||||||||||||||||||||||||||||||||||||||||||||||||||||||||||||||||||||||||||||||||